
iVentoy Get Started
- 1. Download iVentoy
Download iVentoy Windows/Linux package according to your OS. For example iventoy-1.0.00-win64.zip
Extract it, Attention that there can be no unicode chractors or space in the full path. The directory layout is as follows:
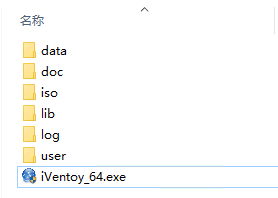
For the directories:
| Directory | Description |
|---|---|
| data | For License file, config files. |
| doc | For document |
| iso | For ISO files. |
| lib | For library files that needed by iVentoy. Don't put other files here. |
| log | For log files. |
| user | For user files, third-part software, auto install scritps ... |
- 2. Copy ISO files
Copy all your ISO files to iso directory, you can create subdirectories arbitrarily under this directory to classify and store ISO files.
Attention that there can be no unicode chractors or space in the directory name or ISO file name.
It should be noted that, you don't really need to copy the ISO file from another location to this iso directory, you can also use soft link.
For example: you can use mklink in Windows and ln -s in Linux.
mklink D:\iventoy-1.0.00\iso\ubuntu-22.04.2-desktop-amd64.iso  E:\download\ubuntu-22.04.2-desktop-amd64.iso

ln -s /opt/download/ubuntu-22.04.2-desktop-amd64.iso  /home/panda/iventoy-1.0.00/iso/ubuntu-22.04.2-desktop-amd64.iso
You can also link for a directory as follows:
mklink /D D:\iventoy-1.0.00\iso\ubuntu  E:\download\ubuntu

ln -s /opt/download/ubuntu  /home/panda/iventoy-1.0.00/iso/ubuntu
Even the entire iso directory can be linked from another location.
Considering future iVentoy version upgrades, this is actually a recommended approach. For example:
rmdir D:\iventoy-1.0.00\iso
mklink /D D:\iventoy-1.0.00\iso  E:\download\iso

rm -rf /home/panda/iventoy-1.0.00/iso
ln -s /opt/download/iso  /home/panda/iventoy-1.0.00/iso
- 3. Run iVentoy
Just click the exe file in Windows. For Linux, run sudo bash iventoy.sh start in the terminal.
- 4. iVentoy GUI
iVentoy GUI is based on WEB, so please open your browser and visit http://127.0.0.1:26000 after you run iVentoy.
You can also visit http://x.x.x.x:26000 from another computer (x.x.x.x is the IP address of the computer that run iVentoy).
For example, you run iVentoy in a Linux server which has no GUI, then you can visit http://x.x.x.x:26000 from another computer.
iVentoy will automatically open the browser when run in Windows OS.
Attention: Please use Google Chrome or FireFox browser to avoid compatibility problem.
- 5. Start PXE Service
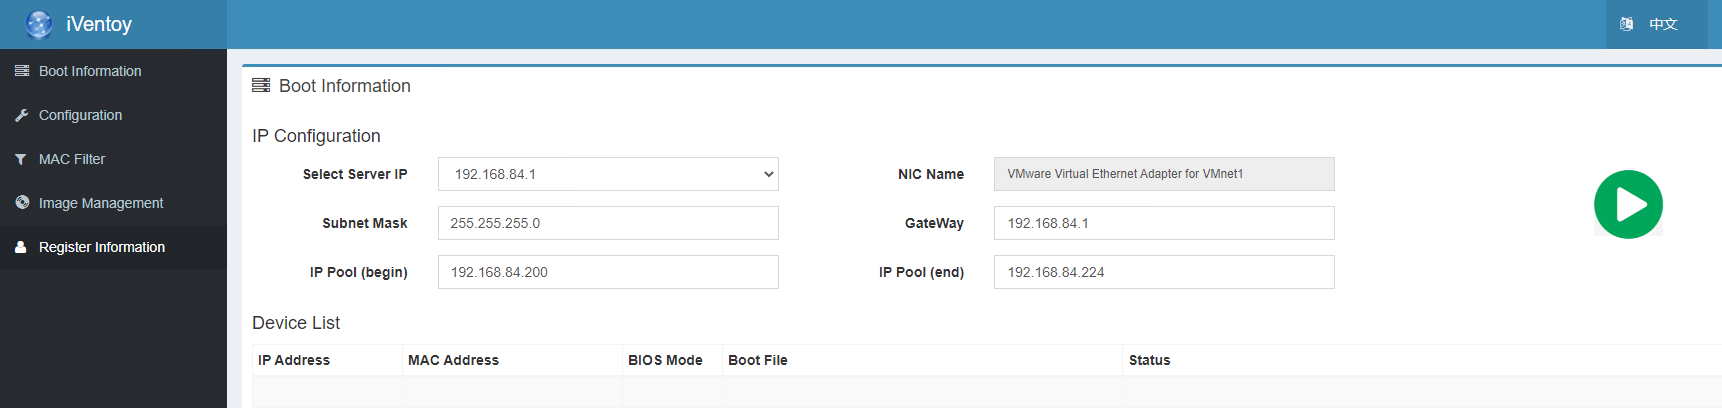
Select server IP and set the IP pool, then click the green button to start PXE service.
- 6. Linux Auto Start
For Linux you can run sudo bash iventoy.sh -R start
to auto start the PXE service.
With -R option iVentoy will automatically start PXE service with last configuration, so you don't need to click the green button anymore.
Of course you should have set the parameters and clicked the green start button at least once before to make the configuration data saved.
- 7. Windows Auto Start
Windows version can register autorun service, please refer: Register Windows Service